It’s not new that many web application nowadays is SPA (Single Page Application) and it tends to grow a lot.
In this article, I will show how it’s easy, simple and cheap to deploy your web app in a few minutes using AWS S3 & CloudFront.
We have a sort of different providers to host those web apps. (AWS Amplify, Heroku, Netlify, Cloudfare, Akamai, etc) and a lot of frameworks to develop it (React, Vue, Angular, etc).
I presume you have basic knowledge about AWS before reading this article, if I am wrong, no worries, just do a quick google and you’ll find a lot of content. If you are not using AWS, you might find the content about cache useful :)
Note: For this tutorial, we’ll follow all steps using AWS Web console interface, although it can be easily done using automatic tools as such as aws-cli, aws cloud formation, etc.
All the files and code are available in this github repositry.
Why I like AWS Cloudfront?
- AWS Lambda: My favorite one! AWS introduced Lambda@Edge which allows us to manipulate requests/responses and customize the content delivered through the Amazon CloudFront CDN. What if you want to redirect the users when the request comes from a specific location? What if you want to deliver different content if users access your website using mobile devices? What if you want to use services like Prender.io to deliver pre-rendered page if the request was made by a search engine bot crawler? All this and much more can be done using AWS Lambda Edge and it’s really powerful and customizable. I‘ll talk more about AWS Lambda in next article and how we can do things such as deliver pre-rendered content for SEO Optimization. check here some lambda examples.
- Price: If you manage your CloudFront apps caching in the right way, you’ll save a lot of money
- If you already use other services from AWS you might find easy to keep all in the same place.
- Easy setup and configuration using either aws-cli or aws web console.
- Free ssl certificate, custom gzip, possible to restrict viewer access using cookies or signed urls.
- Statistics: Cloudfront provides different types of statistics for your web app: access by device type, access by browser type, access by country, files most requested, cache statistics, etc.
- Integration with Route 53. I’ll talk about that in the last section of this article. Reliable: Cloudfront is fast, reliable and used by companies like Spotify and Slack. Cloudfront case studies , Stackshare - companies using Cloudfront
What is a single page application?
If you don’t know what is a single page application just have a look at this article written by Neoteric. What is a single page application
I divided this tutorial into 8 sections:
- General overview of caching and how CloudFront works with S3.
- Create S3 Bucket, make it public read access and enable static website hosting.
- Build our SPA to generate website static files.
- Install, configure and use AWS-CLI (a tool to copy website files to S3 Bucket and send invalidation request to CloudFront)
- Upload our static web site files to the bucket setting correct cache headers
Dealing with cache in single page apps is really critical, we need to make sure that users will always see the new content after a new deployment/update. Also if you use cache headers correctly, you will save your budget and your web app will be like a rocketship — Trust me.
- Create CloudFront distribution and send an invalidation request.
We’ll create and setup our cloudfront distribution and learn how to send an invalidation request using aws-cli. Have you ever see the classic issue of SPAs when user needs to clear the cache to see the changes after a new deployment? We need to do that to keep the content always fresh.
- Add custom domain and SSL Certificate We’ll see how can we easily create a SSL Certificate and attach a custom domain to your distribution
- Review & Next Steps
We’ll talk about how can we manage our aws cloud resource using automatic tools as aws-cli/aws-cloud formation and how to implement continuous integration/deployment. Also I’ve plans to talk more about AWS Lambda and how it can be really powerful using together cloudfront.
Caching, CDN, Cloudfront & S3
What is AWS S3? As described by AWS - is a simple web services interface that you can use to store and retrieve any amount of data, at any time, from anywhere on the web. Basically, you can store objects and access them through HTTP requests.
A Single Page Application (a.k.a SPA) is nothing but a bunch of files including javascript, css, fonts, images,html files, etc and usually has an entry point (index.html) which contains all entries and reference to all needed scripts/fonts/css to run our application. These files are usually generated at build time and result as output of build process (We not diving into build process but it’s really important to understand how your application is built. Most part of nowadays frameworks have built-in solutions to build your web app,e.g. angular (angular-cli, create-react-app)
Cache and common issues
Every time when you load a web app the browser downloads all the necessary files (including HTML, javascript, CSS, fonts, etc) to run the application. Let’s suppose that you have an application developed in angular. When you first access the website your browser will download everything and depending on the cache headers returned in HTTP response of each file, the browser will cache it, so the next time when you load the website browser will check if it has the file on cache then it won’t be necessary to load the file from server again.
This is really important for website performance (if your website does not use cache you’ll notice that it will lose score at google page speed test tool — Google page speed tool.
If you access your browser inspector and go to Network Tabs you can find from where browser fetched the files (some of them came from cache) and also view HTTP cache headers from responses. (they will tell browsers how they should cache your content)

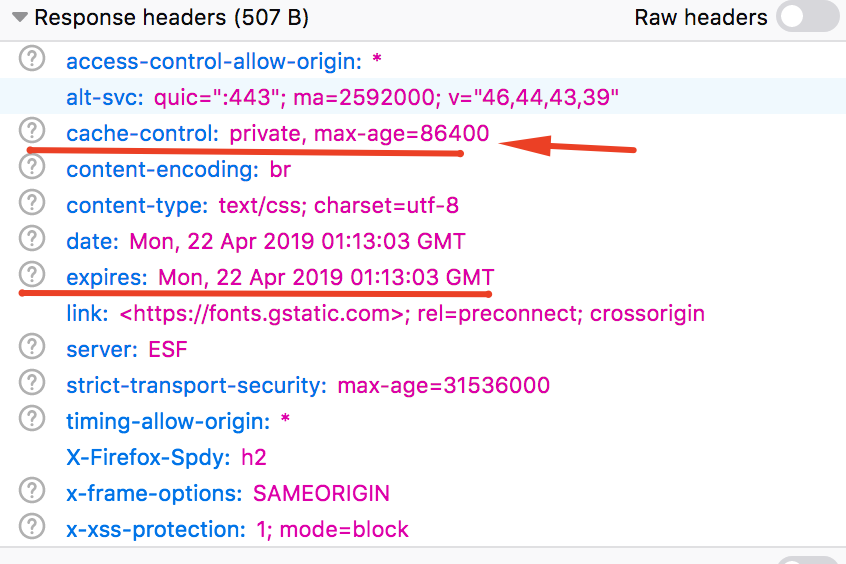
We should be always aware of using cache. I strongly recommend having a read on this article written by Mark Nottingham to understand how cache headers work under the hood.
Why cache can be tricky
Let’s suppose that your website has a javascript file served with HTTP header telling browser to cache it for 7 days. Then in the next day, you find a bug and need to update it. If you simply change file and upload it to the server, users that have already accessed your website won’t see any change as the file still cached and the browser won’t even request the updated javascript file to your server again. We currently have a lot of approaches to solve this problem:
- Change filename after every update: Generally after every build, most part of frameworks already do that using web pack. Your CSS/javascript files name always change after every build. eg.
5.03f99a2add8f74c93cb2.jsbecome6.60586bba6b0bca088238.js. You might have seen some files with queryString params:myJsFile.js?version=1,myJsFile.js?version=2. Doing that we make sure that after update the user will get the new content, even though if old content was cached on the browser. - Do not cache
index.htmlfile: Theindex.htmlfile contains all links to other assets used by your application. After you generate a new build, the file names and link references will also change, so can you imagine what will happens if your browser does not always get fresh index.html? Users that accessed your website before will not get the new index.html files with new references to scripts, css, fonts, etc they must have to clear the cache to get the changes. - Do not cache
service-worker.jsfile: If you are using PWA, I’ve seen some recommendations to not cacheservice-worker.jsfile. Please have a look at https://stackoverflow.com/questions/38843970/service-worker-javascript-update-frequency-every-24-hours/38854905#38854905, https://github.com/GoogleChromeLabs/sw-precache/issues/332
You might have some questions: How should I decide which files might be cached and for how long?
- If the users need to clear the cache to see any update in your single page application you might need to review your cache policies.
- Be aware of which files you are caching, for how long and what is the impact of that. In this example, we cache everything (js, css, fonts, etc) for 1 day, except HTML files. It can change depending on the situation.
- Every time when you deploy a new version/change to our website all the users should be able to get the updated content after a single page refresh.
- For last, you should keep track of which files compound your web app and decide what is the best cache option for each. e.g: Whenever you add cache to all javascript files and they tend to change, make sure that filename will change after an update as described before.
Overview of AWS S3 & AWS CloudFront and Caching
Now we will do a quick overview of how S3 works with Cloudfront. Cloudfront is a CDN (Content Delivery Network, if you are not familiar please have a look at this article: Cloudfare - what is a CDN.
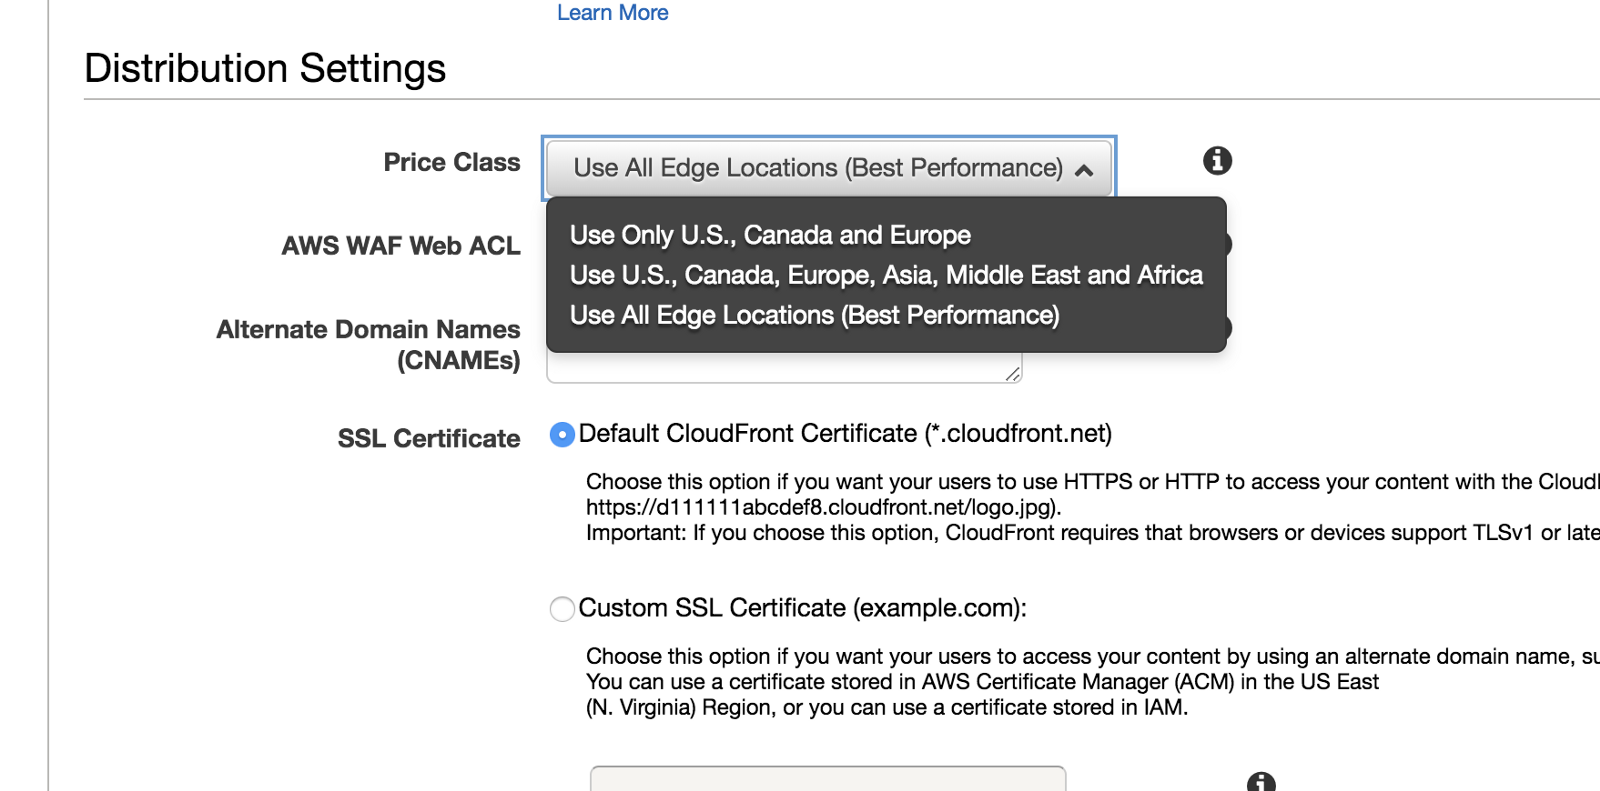
Basically, Cloudfront CDN will serve your website content across different regions on the globe. So, if you access the website from North America, you request will be redirected to the closest CloudFront EDGE from your location and it will deliver your website content over a secure connection (SSL) and low latency. When you create a distribution you can choose which areas you want:
How CloudFront works and what is the relationship with S3
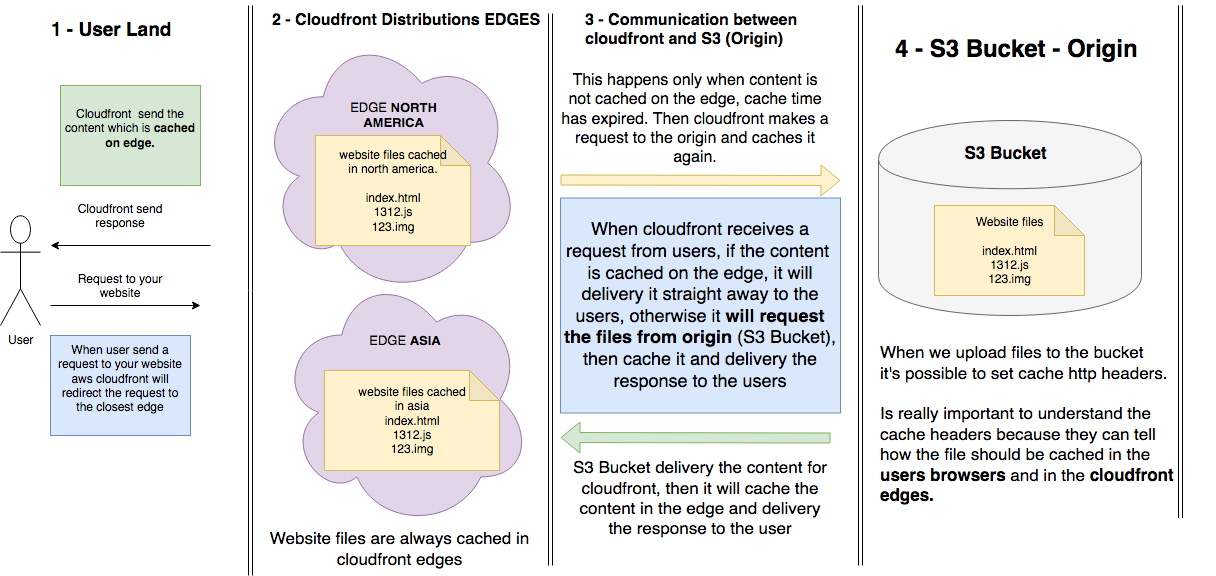
Let’s now dive into the relationship between CloudFront and S3. Please have a look at the image below:
-
Users requests are always delivered from CloudFront edges.
-
The website content is always cached on the CloudFront edges.
-
Usually, the content will be cached in edge for longer times because we have control and we can easily purge CloudFront cache anytime and force it to fetch the updated content from S3 Bucket and cache it again. This will happen after every new deployment.
-
When a user sends a request to your website, CloudFront checks if the file is on the edge cache, if yes it will hand it over straightaway, otherwise it will send the request for origin (S3 bucket), then cache it on the edge again. (This will happens typically when we send an invalidation request after a new deployment).
-
You can see whether the requested file came from CloudFront edge cache or not, inspecting the response HTTP header X-CACHE property. In the case below, Miss from CloudFront means that file was not found on cache, so we know that CloudFront requested the file to the bucket.
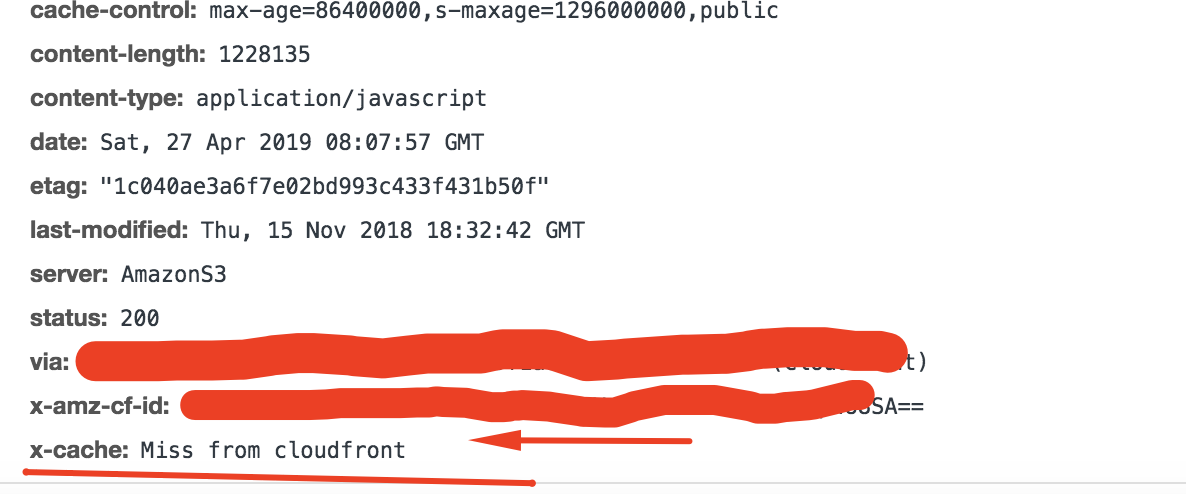
In the next image, the returned x-cached Hit from CloudFront means that file was found on cache, so CloudFront just delivers it
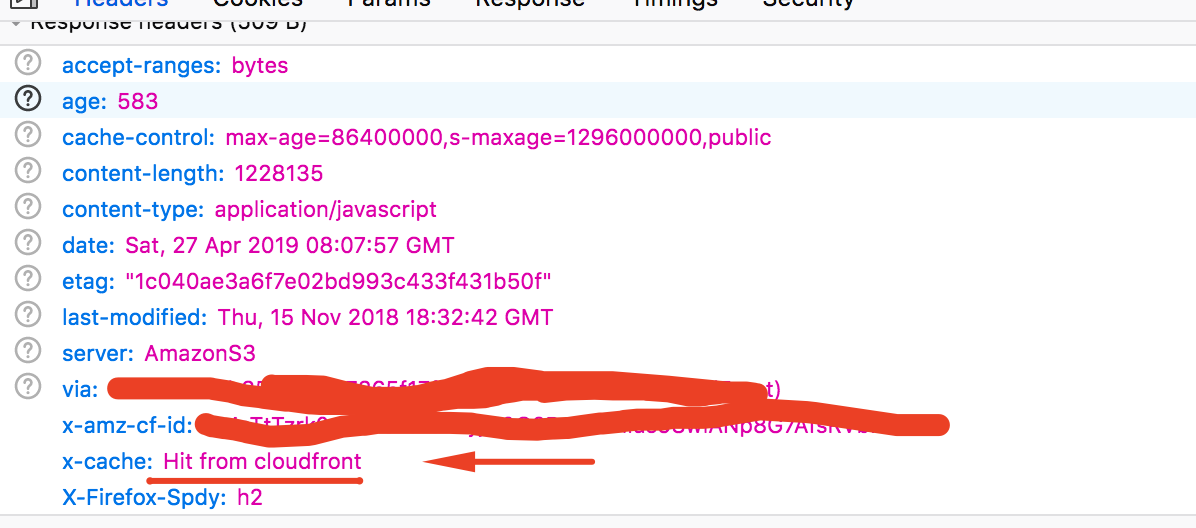
Essentially, Hit from Cloudfront should be always more frequent then Miss. You can see cache statics of your distribution to troubleshoot cache issues.
-
Is important to understand the relationship between cloudfront and S3 Bucket. Basically, S3 bucket(Origin) deliveries our website content to the CloudFront edges and then the edge will cache it. CloudFront will request files to the bucket again only if has not it on the cache or the cache time has been expired. We’ll see later why it’s important to invalidate CloudFront distributions after a new deployment (which means purge cache in edges)
-
We’ve talked before about caching on user browsers, now we’re talking about cache on CloudFront edges. Dealing with cache in users browsers is a way more critical than dealing with cache in CloudFront edges, because we can’t purge cache in user browsers whenever we want, once the file is cached in user browser, it will be purged only when it expires or when user clear the cache, because of that is really important to be careful when setting cache for your website files.
-
We set all cache headers at the moment that we upload the files to the bucket using aws-cli, we’ll go through this in the next step.
-
If you set the cache headers for users browsers correctly you might reduce your CloudFront cost drastically. As you pay per requests, if you cache the files in users browsers, it will be requested to the server again only when cache expires or a new deployment have been done. Let’s suppose that you cached your website’s files for 24 hours and the same user visited your websites 30 times in a day. On the first visit, the browser will request every single file from server and caches it on the browser. Then in next requests, the only content that user browser will request to the server will be the
index.html.
Let’s suppose that a user loads your website 100 times per day, in the first request he will send requests to load a lot files (index.html, javascript, css, images, fonts, index.html). After that, the other 99 requests will request only the index.html from the server (as we not cache it). So you will reduce your cost drastically
Please do not forget to read this article and understand how cache works in CloudFront edge and in browsers. We’ll go forward on that in step 5. AWS - Cloudfront and Browser Caching
Okay, let’s finally get in action. I hope you guys not feeling overwhelmed.
Create S3 Bucket, make it public read access and enable static website hosting
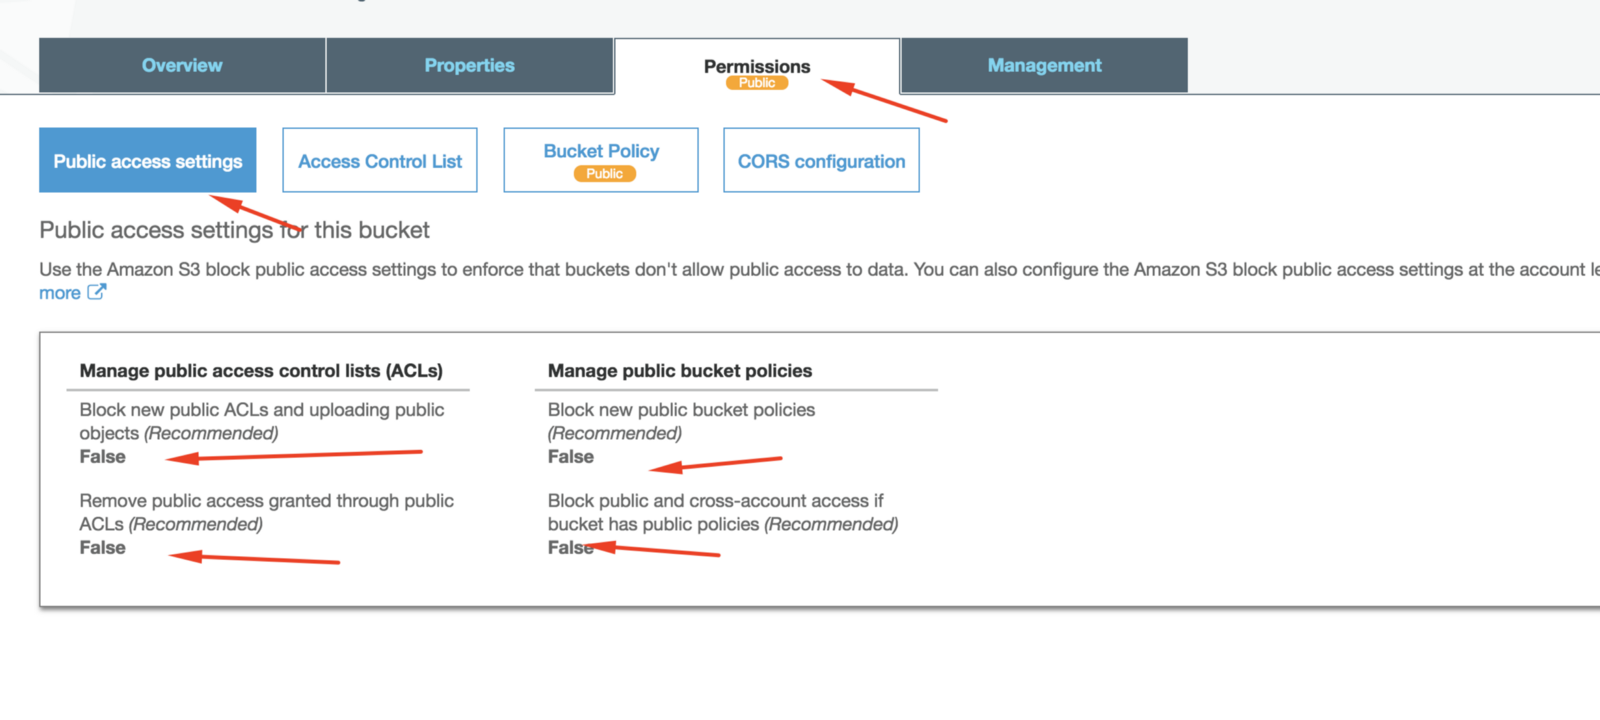
Using AWS Web Console, access S3 Service and create a new bucket. Then click on the bucket and access the permission tabs to make it public: Click in public access settings and make sure that all four options are set to false.
Access the Bucket Policy Tab and copy this policy below which will make the files of your bucket public (replace your-bucket-name with your bucket name):
{
 "Version": "2012–10–17",
 "Statement": [
 {
 "Sid": "PublicReadGetObject",
 "Effect": "Allow",
 "Principal": "*",
 "Action": "s3:GetObject",
 "Resource": "arn:aws:s3:::your-bucket-name/*"
 }
 ]
}
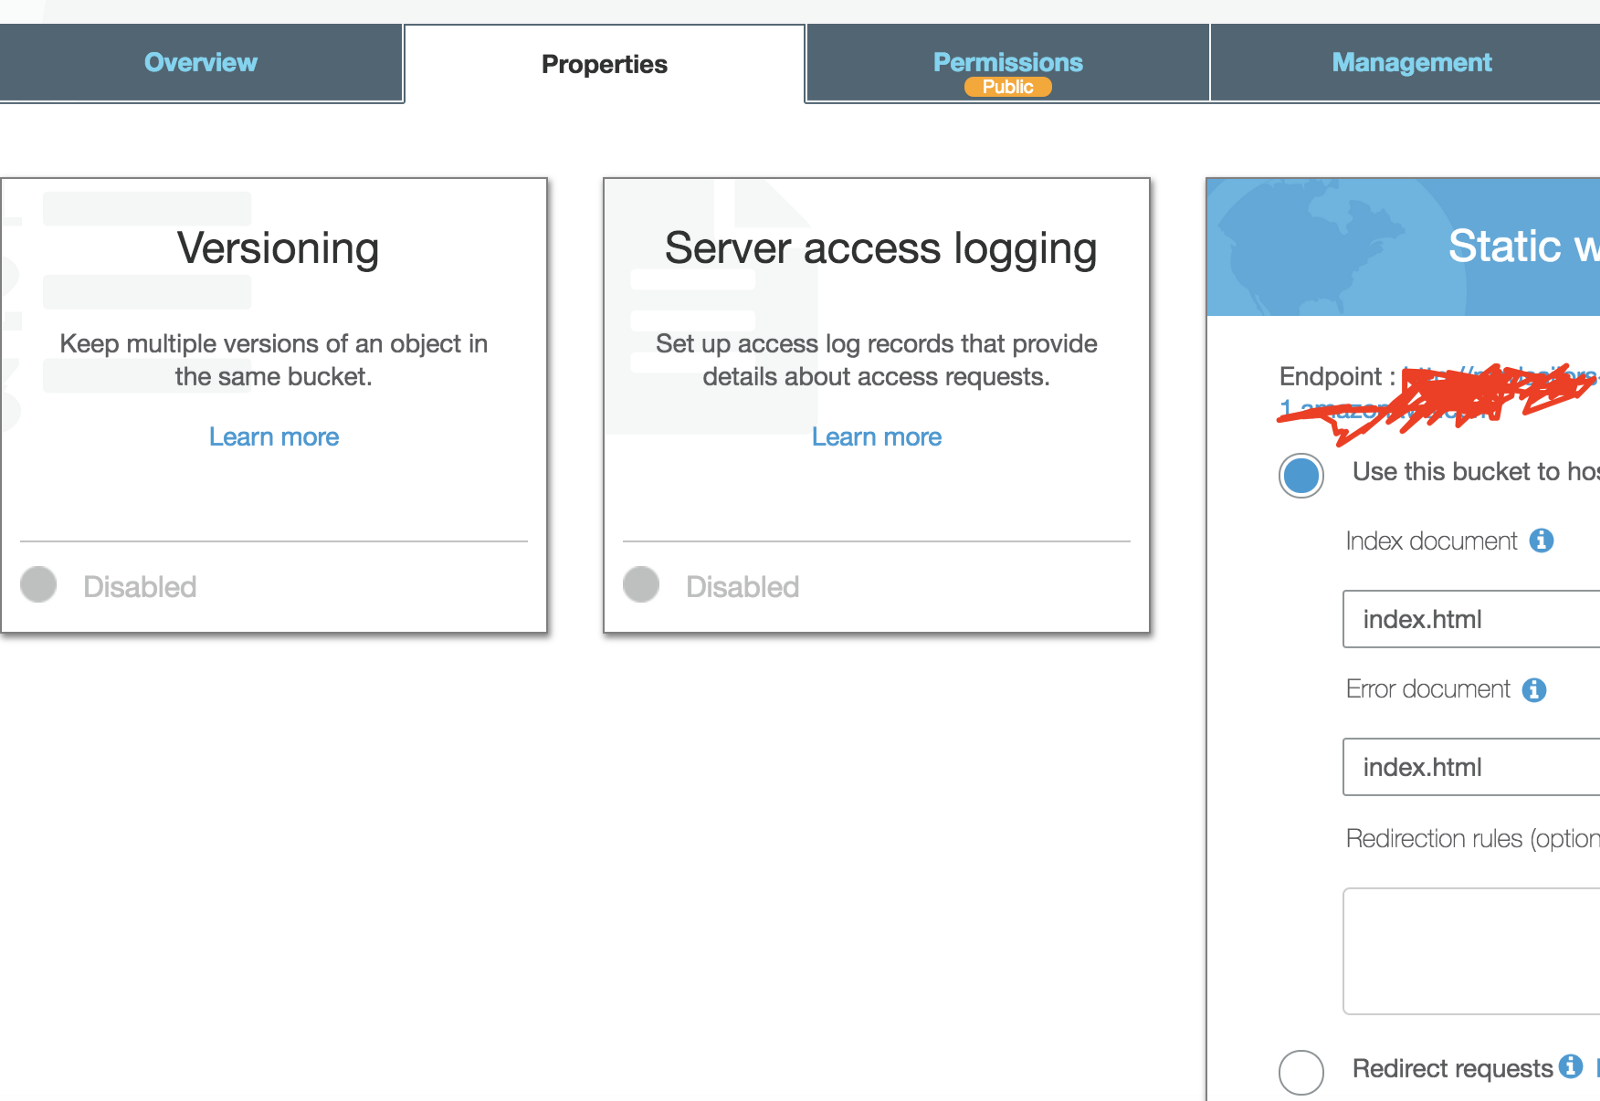
Now go under Properties and select static website hosting and set index.html for both index and error document. I’ll explain later why we should always set index.html as index document for both error and index document.
All done! Now we moving forward to build our web app and generate static files.
Build Web App
I am not gonna dive deep into this as we have a lot of options to generate website build assets, we have a lot to discuss and optimize the build process, reduce bundle size, lazy loading & code splitting, etc, but I am not gonna go through it now.
If you are using angular cli, its come with a built-in solution and all you need to do its run the command ng build --prod to generate your web application folder.
If you are using react js, create-react-app has also a built-in solution to generate your web-app: npm run build.
As I mentioned before the most part of these tools use webpack under the hood.
The main thing that we should be concerned about what kind of files your website have and also which ones should be cached (most part of them, including javascript files, images, css, etc) and which ones we should avoid to caching (as index.html, serviceWorker.js). The most part of tools generate a new js/css filenames after a new deployment, so we don’t need to worry about adding a new query string to the scripts to force browsers to download new content.
Install and configure AWS CLI
The AWS Command Line Interface - AWS CLI is a unified tool to manage your AWS services. With just one tool to download and configure, you can control multiple AWS services from the command line and automate them through scripts.- Definition from aws website.
As I mentioned before, all that we are doing using AWS Web Console Interface can be done automatically using aws-cli. We could use it to create the bucket, CloudFront distribution, etc. In this case, we will use aws CLI only to upload files to S3 bucket and send invalidation request to CloudFront. It requires python to be installed.
Open terminal and type:
pip install awscli
For more information on how to install please access AWS - How to install aws-cli
Now we need to create a user and assign permission to upload files to the bucket and send CloudFront invalidation requests. We will need to access AWS IAM ( Identity and Access Management) to create a user and get AWS Keys credential to use aws-cli.
Basically, when you create a user AWS allows us to generate a key pair, then we can use it later to manage aws services using aws-cli. We need to assign permissions for the user, then the key pair set up in aws-cli will have same permissions of this user. We can set permission for a user assigning them to a group or attaching a specific policy. For this tutorial, we will create a policy with permission to upload files to S3 Bucket and send CloudFront invalidation request.
So, follow the steps below to create the user and get the key:
-
Access AWS IAM Management Console.
-
Create a policy to be attached to the user later.
Access tab POLICIES and click on Create Policy. We’ll define policy permissions using a JSON File configuration. Please copy JSON content below under JSON tab when creating the policy. This policy will have permission to list the s3 buckets, upload files and send CloudFront invalidation request. Please remember to replace my-bucket with your bucket name before saving the policy.
{
    "Version": "2012-10-17",
    "Statement": [
        {
            "Effect": "Allow",
            "Action": [
                "s3:ListBucketMultipartUploads",
                "s3:ListBucket",
                "s3:GetBucketLocation"
            ],
            "Resource": [
                "arn:aws:s3:::your-bucket-name"
                ]
        },
        {
            "Effect": "Allow",
            "Action": [
                "s3:PutObject",
                "s3:GetObjectAcl",
                "s3:GetObject",
                "s3:AbortMultipartUpload",
                "s3:DeleteObjectVersion",
                "s3:PutObjectVersionAcl",
                "s3:GetObjectVersionAcl",
                "s3:DeleteObject",
                "s3:PutObjectAcl",
                "s3:GetObjectVersion"
            ],
            "Resource": [
                "arn:aws:s3:::your-bucket-name/*"
            ]
        },
        {
            "Effect": "Allow",
            "Action": "s3:ListAllMyBuckets",
            "Resource": "*"
        },
         {
            "Effect": "Allow",
            "Action": [
            "cloudfront:CreateInvalidation"
           ],
            "Resource": "*"
        }
    ]
}-
Access the tab “Users” and click on “Add User”
-
Select the option Programmatic access (needed to generate a key pair value)
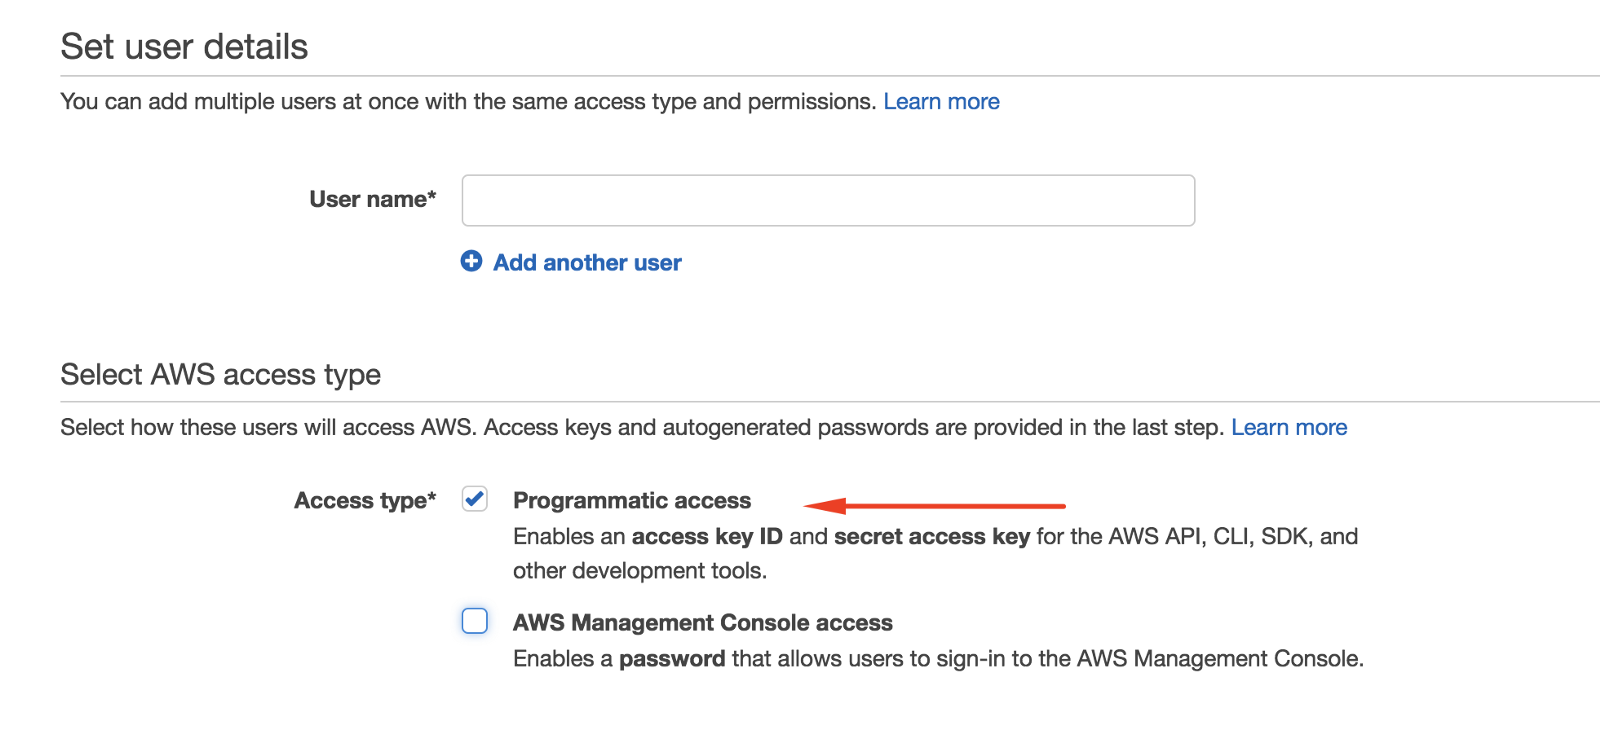
Save the user and copy your key pair value.
Note: Keep this key safe, because whoever has it will have permission to delete/upload files to your bucket. Do not upload this key to your repository and keep the key value secret when using docker or another continuous integration tool.
- For last, attach the policy to the user.
Under user permission section, select Attach Existing Policies directly, then click in filter policies and select only Customer Managed Policies. Select the policy that you have created and save it.
Now we need to configure aws-cli to add the key that we just have created. Open your terminal and type:
aws configure
You will be prompted to inform your access key and your secret key and the region which your bucket is located. Just copy & paste the user key and inform the region (e.g us-east-1, us-west-1).
Now we ready to upload files to the bucket.
Upload files to the bucket using correct cache headers
I’ve mentioned before that we need to be aware of using cache headers and also understood that we need to deal with two kinds of cache:
- Browser Caching: More critical
- CloudFront caching: Less critical and longer.
Please before proceed have a look at this aws article provided in aws website to understand how cache works in the edges and in browser:
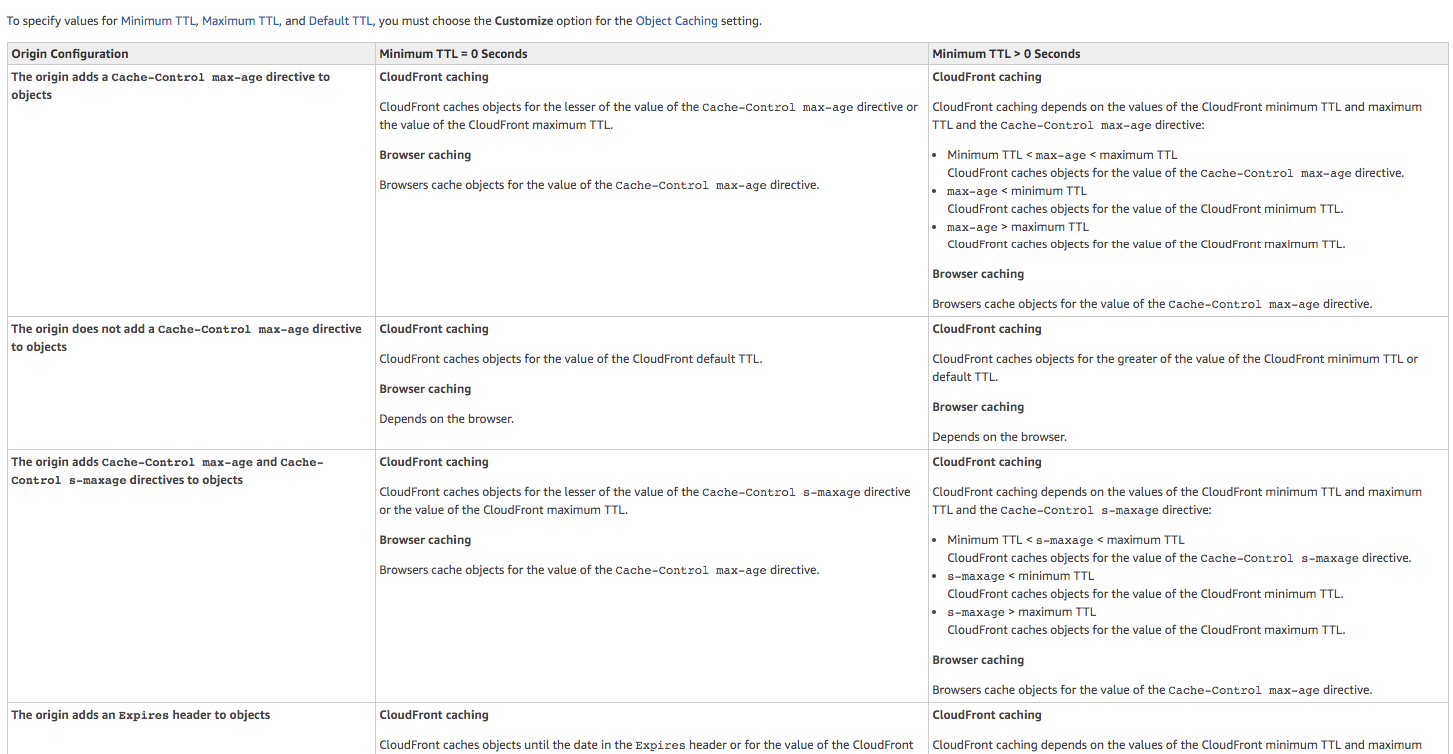
In the next step, we’ll create CloudFront and set up Default, Minimum and Max TTL to 31536000 seconds (1 year).
-
Cache on CloudFront value will be 31536000 seconds (1 year): Objects will be cached on cloudfront edge “forever” until we send an invalidation request after a new deployment,
-
Cache on user browser will be for 1 day: max-age=86400000 milliseconds.
The first command will upload all files to the bucket and set the cache headers (max-age 86400000–1 day). This cache header will be delivered to the browser, then it will be cached for 1 day. We do have other cache options as expire, but in this example, we’ll use only max-age. (Do not hesitate to have a look at this [mark nottingham article](https://www.mnot.net/cachedocs/) about how cache headers work on browsers_).
The first command will be aws sync with - delete option. This basically will upload your website build files to the bucket and remove everything which is on the bucket but not on your build folder and replace/addfiles which have changed or added. You have many possible combinations to aws s3 sync command, for example -exclude directive, when you do not want to upload a specific file or folder from your build folder. Please have a look at AWS CLI Sync Command to get all possible methods.
aws s3 sync --delete YOUR_WEBSITE_BUILD_FOLDER/ s3://YOUR_BUCKET_NAME --acl public-read --cache-control max-age=86400000,publicNow we need to remove cache headers of index.html files. With this script we update cache header (max-age=0,must-revalidate,public - content-type) and charset of all HTML files in the build folder. (If you need to cache others html files, just change the -include directive in command)
aws s3 cp s3://YOUR_BUCKET_NAME s3://YOUR_BUCKET_NAME --recursive --include \"*.html\" --metadata-directive REPLACE --acl public-read --cache-control max-age=0,must-revalidate,public --content-type \"text/html; charset=utf-8\"Note: We’ll create an npm script in package.json file with will execute all of this commands automatically. Now all the files are already in the bucket. Now we will create our CloudFront distribution.
Create CloudFront distribution
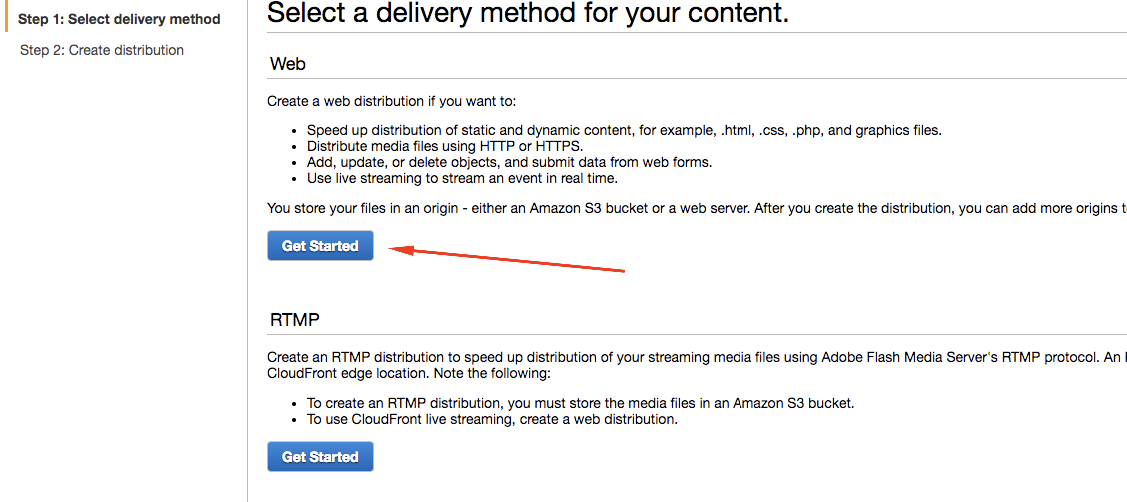
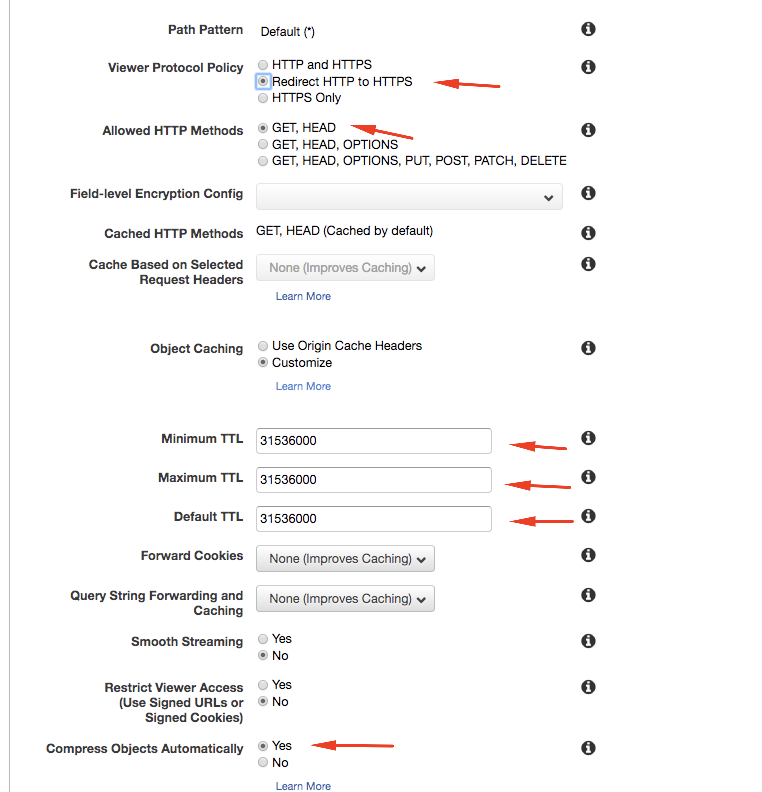
In Origin Domain Name select the bucket that you’ve previously created. Viewer Protocol Policy: Redirect HTTP to HTTPS Object Caching: Select customize and fill value 31536000 for Minimum, Default and Maximum TTL. Compress objects automatically: Select yes, this will serve your content with gzip compression.
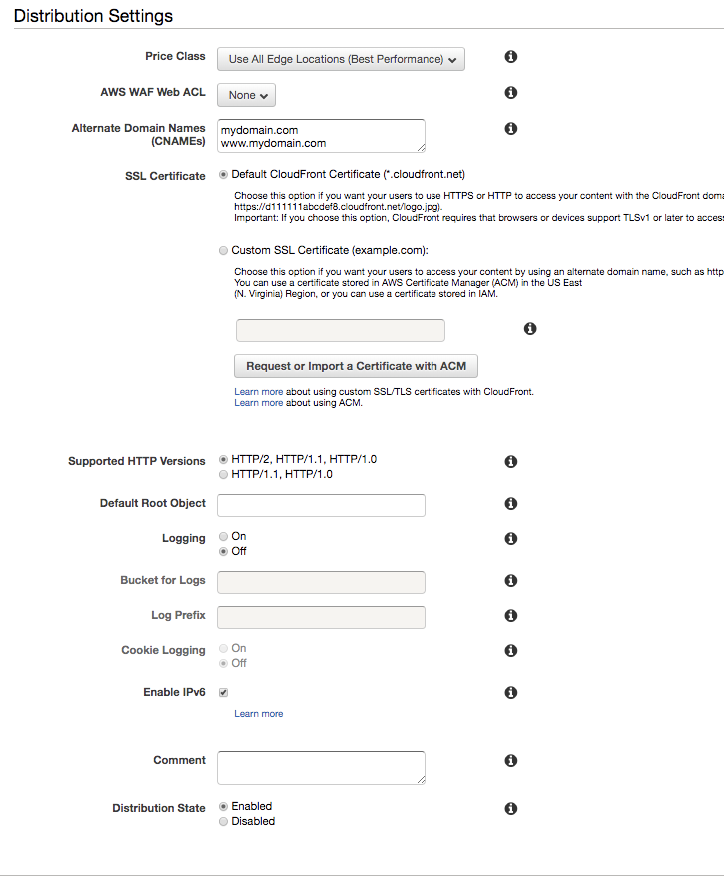
Distribution Price Class: Select where you want to have edges serving your content. Please check the [AWS Calculator] (https://calculator.s3.amazonaws.com/calc5.html).
Alternative Domain Names: Fill with the domain name that will be associated with your website. Don’t forget to fill because we will need to use it later on Route53.
SSL Certificate: Leave it as Default Cloudfront Certificate for now. I’ll show how to create a SSL certificate for your CloudFront distribution in the next section.
Security Policy: TLSv1.1_2016 (recommended). This is SSL/TLS protocol that CloudFront uses to encrypt the content that it returns to the user. Please have a look at AWS - Connection ciphers to understand what is the differences between all of them and why you should use the recommended.
Supported HTTP Versions: HTTP/2, HTTP/1.1, HTTP/1.0
Default Root Object: index.html. This will be the entry point of your application. When some user accesses your website with some path in URL (e.g. mysite.com/path/otherpath) it will deliver index.html. Cloudfront does not know the information of this path/route as all routes of your single page application are being resolved by our front framework router (e.g React router, angular router module). When the application is loaded by the browser it will load correctly route.
Distribution State: Enabled
Now your distribution is ready and in few minutes it will be accessible through CloudFront default address which will be something like d45das8dnasdhy13d.cloudfront.net.
You can also find your distribution-id in cloudfront distribution list. You’ll need it to send invalidation request.
Invalidation Request
As mentioned before, every time after a new deployment we need to send an invalidation to purge the cloudfront cache. It will be done easily using the command:
aws cloudfront create-invalidation - distribution-id ${distributionId} - paths \"/*\"CloudFront configuration: Custom SSL and attach custom domain to distribution
We need to do two more tasks:
-
set some rules for 403 and 404 responses
-
create an SSL certificate for CloudFront and attach it to a custom domain.
-
Configuring errors responses:
As I mentioned before, CloudFront does not know whether a specific path route exists or not. All the routes information sits on the front end code (eg. react router, angular router module), so if the user accesses your website using some path, for example, mywebsite.com/path/secondpath when CloudFront redirects this request to the bucket, it will return 403 response as it does not know reconizge this path (also it does not exists on bucket), but it still has to deliver index.html file to the user and leave it for frontend framework resolves if route exists or not.
To solve that, we need to set custom error responses for 403, 404 responses. For that, access the Error Pages tab in your CloudFront distribution and add two error response errors for http 403 and http 404 status code. All of them should have response page path as index.html and we can use Minimum Caching TTL sx 300 and response code as 200. The result should be something like the image below:

Note: Many people misunderstand why do we need to add this custom error responses and this could be tricky for SEO Optmization. If some route or path not exists, your website should return 404 response code. This example and many SPA returns http 200 status code even if the route does not exists. If you are using server side rendering you can easily solve this problem, otherwise we can use AWS Lambda do deal with that. I’ll talk more about it and how we can handle that and also deliver pre rendered content using AWS Lambda + Cloudfront.
- Setting up an SSL Certificate and Custom Domain using ROUTE 53:
AWS allows creating free SSL certificate to be used across its services. Access aws certificate manager(https://console.aws.amazon.com/acm/home) and add a new certificate.

Add your domain names and clicks in add. You can add multiple domain names to be included in SSL Certificate, e.g. (www.yourwebsite.com, *.yourwebsite.com).
After that, you have to VALIDATE your certificate using the dns entries of your domains or the domain owner email address. Just follow the instructions and validate it.
If you choose to validate using the domain owner AWS will send a link to the email, then you just need to access it and SSL will be validated.
If you choose to validate using your DNS Address, just add the CNAME entries in your domain record as it recommends, then wait a few minutes and click on the refresh icon. Then your domain will be validated and you will be able to proceed with SSL creation.
Note:If you are using Route53 it allows you to automatically add the same entry in your hosted zone. I am not diving into how to use route53 , but get in touch if you have any question: )
Setting up an SSL Certificate and Custom Domain using ROUTE 53:
Now we need to create an entry in our domain to point for our CloudFront distribution. Essentially you have to create a CNAME entry in your domain pointing to CloudFront distribution, but I’ve faced some problems in adding a CNAME in the root domain.
Let’s supose your website is www.example.com, if you add a CNAME entry for *.example.com (root domain) it will create a conflict with google domain email entries for example. I’ve faced this issue and after a long time researching I found out that AWS provides an ALIAS entry in Route53 to be used for these situations, solving my problem.
I strongly recommend using Route53 as your domain provider, because it is really reliable and easy to use.
Access your route53 hosted zone and create a new record set. Insert the domain name and select ALIAS option. After that, Alias Target option will list all AWS available services to be attached to the domain.
If you set up ALTERNATIVE CNAMES correctly when creating the CloudFront distribution, it will be available under CloudFront distribution. Please see image below (In your case the cloudfront distribution should be available for selection):
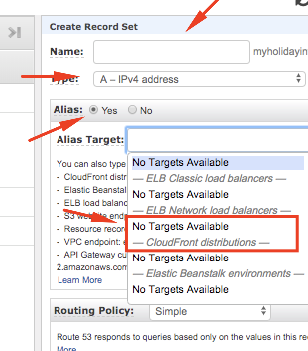
After that, go back to your CloudFront distribution, clicks in ‘Edit’ and select the SSL Certificate to your distribution

Finally, everything should be ready and your website should be accessible 7 your custom domain and with secure SSL Certificate.
Review & Next Steps.
So, now we have learned how to create and set up a single page application using AWS CloudFront.
Basically, you can have a simple npm script defined in package.json that will run the commands to deploy your website:
-
First command will build your web application.,
-
Second command you upload the files to S3 Bucket.
-
The third command will change cache headers of html files.
-
The fourth and last command will send an invalidation request to purge the cloudfront cache.
We still have a lot to improve and discuss, for example:
- How to pre render content for SEO optimization,
- How to integrate this deployment using CI/CD (continuous delivery & deployment)
- How to set up everything (bucket and cloudfront creation, ssl, etc) using aws-cli.
- Limitations of this deployment method.
I have plans to talk about AWS Lambda and how it can be powerful when used together Cloudfront and how to optimize it for SEO. Hope this article has been useful for you.
Most of the codebase used is available at this repository: https://github.com/lucashfreitas/react-angular-deploy-s3-cloudfront. I’ll update it as soon as possible :)
Feel free to share and comment if you have any question or suggestion!
Cheers!